
Bathroom waterproofing is not just a matter of applying a tanking product to the floor. A reliable scope should explain how water will be controlled at every vulnerable junction: around showers and baths, beneath tiles, at wall-to-floor connections, around pipes, beside doors, and through the drainage system.
Before work begins, confirm the substrate, waterproofing method, wet-area boundaries, falls, drainage details, penetrations, product compatibility, testing requirements and responsibility for each task. This checklist helps homeowners compare bathroom remodel ideas, identify missing work and estimate the real scope before committing to a price.
What should a bathroom waterproofing scope include?
A good scope should state what is being waterproofed, how it will be prepared, which system will be used, how it will connect to drainage and what happens if hidden damage is found. It should also distinguish waterproofing from tiling. Tiles, grout and silicone help shed water, but they should not be treated as the primary waterproof barrier.
| Scope area | What to confirm before work begins | Why it matters |
|---|---|---|
| Wet-area boundaries | Shower walls, bath surround, floor and splash zones | Prevents unprotected areas being left beside or behind fixtures |
| Existing substrate | Plasterboard, cement board, masonry, screed, timber or damaged surfaces | The substrate affects preparation, movement and product selection |
| Waterproofing system | Sheet membrane, liquid-applied membrane, tanking kit or proprietary system | Components need to work together and be installed correctly |
| Junctions | Wall-to-floor corners, internal corners, changes of plane and wall-to-bath edges | These are common routes for water movement and cracking |
| Penetrations | Shower valves, pipes, wastes, niches, fixings and toilet connections | Small gaps can compromise a large waterproofed area |
| Drainage | Waste connection, shower tray, linear drain, falls and thresholds | Waterproofing needs a controlled route for water to leave |
| Testing and records | Cure times, flood or pond testing where appropriate, photographs and product details | Creates evidence of what was installed and when |
| Allowances | Removal, drying, repairs, access, waste disposal and remedial work | Avoids a misleading waterproofing-only price |
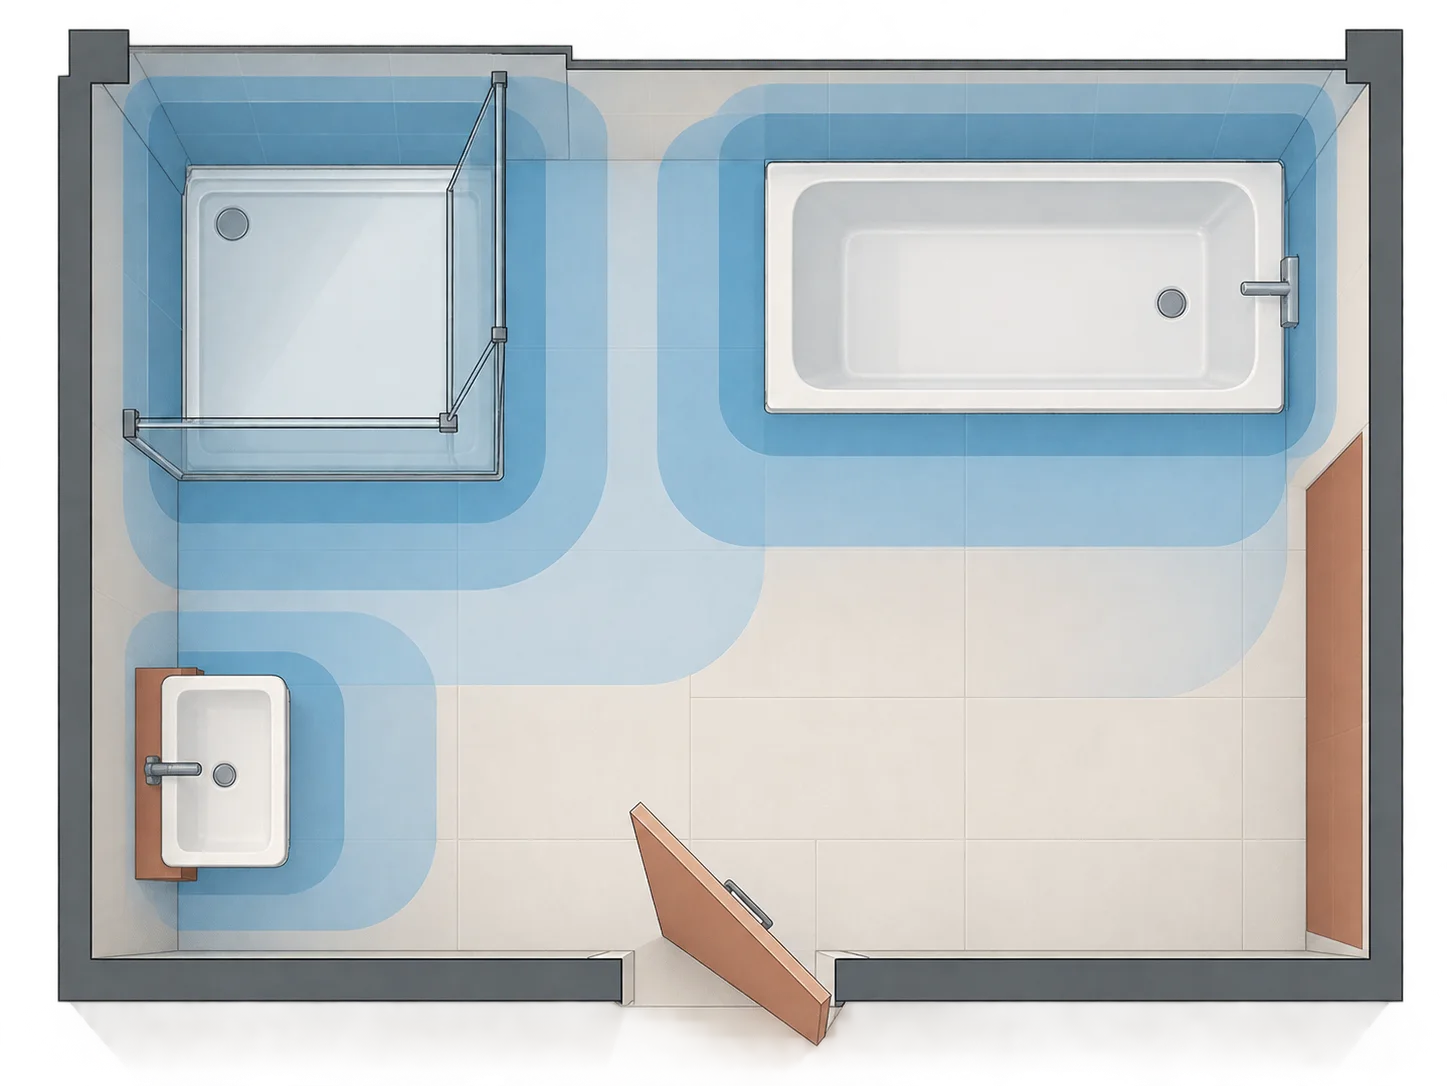
Bathroom waterproofing scope checklist
Use the following list during the design and quotation stage. Ask the installer to mark each item as included, excluded or subject to inspection.
1. Define the wet areas
Mark the areas that may receive direct water, repeated splash or condensation. A typical bathroom scope may include:
- The complete shower enclosure, including all walls and the floor or shower tray area.
- The wall behind and beside a bath where a shower is used.
- The floor beneath a bath, shower, vanity, toilet and other leak-prone fittings, especially where the room is above another occupied space.
- The wall behind a basin if it is likely to receive regular splashing.
- A small return beyond the shower screen or curtain to protect exposed corners.
- The floor around the toilet and any concealed cistern access area.
The exact extent depends on the layout, shower type, screen arrangement and local building practice. The important point is that the boundary should be drawn on the plan or discussed in writing. “Waterproof bathroom” is too vague to price or inspect reliably.
2. Identify the construction behind the finish
Before selecting a membrane, establish what lies behind the tiles or other wall finish. Common backgrounds include masonry, plaster, plasterboard, cement backer board, tile backer board, timber studs and existing tile surfaces.
Record whether the substrate is sound, dry, flat and suitable for the selected waterproofing system. Check for soft plasterboard, swollen timber, mould, salt deposits, loose tiles, movement, cracks and previous leak damage. If the room is being opened up, photograph the structure before it is covered.
In a timber-framed or suspended-floor bathroom, movement control is especially important. A waterproof layer cannot compensate for a floor that flexes, a poorly supported tray or a wall that moves when fittings are used.
3. Specify preparation and removal
Waterproofing performance starts with preparation. The scope should say whether it includes removal of old tiles, adhesive, plaster, sealant, shower trays, baths and damaged boards. It should also cover cleaning, dust removal, priming, levelling, drying and repairs.
Ask how uneven walls and floors will be corrected. A membrane installed over a dusty, damp or unstable surface may fail even if the product itself is appropriate. Similarly, using excessive adhesive to compensate for major unevenness can create voids and weak points behind tiles.
Include a provisional allowance for concealed damage if the existing bathroom has leaked. This does not mean accepting an unlimited variation. It means agreeing how discoveries will be documented, priced and approved before additional work proceeds.
4. Confirm the waterproofing system and components
The quote should name the waterproofing system or product family rather than simply saying “tank walls”. Sheet membranes, liquid-applied systems and board-based solutions each have different preparation requirements, overlaps, primers, reinforcement tapes and drying times.
Confirm that the system includes compatible components for:
- Internal and external corners.
- Wall-to-floor transitions.
- Sealing collars for pipes and mixers.
- Waste and drain connections.
- Bath and shower tray junctions.
- Niches, shelves and benches.
- Movement joints and changes in plane.
- Fixings and penetrations.
Avoid mixing unapproved products from different manufacturers unless the installer can confirm compatibility. Keep the product instructions, batch details and installation information with the project records.
5. Detail corners and changes of plane
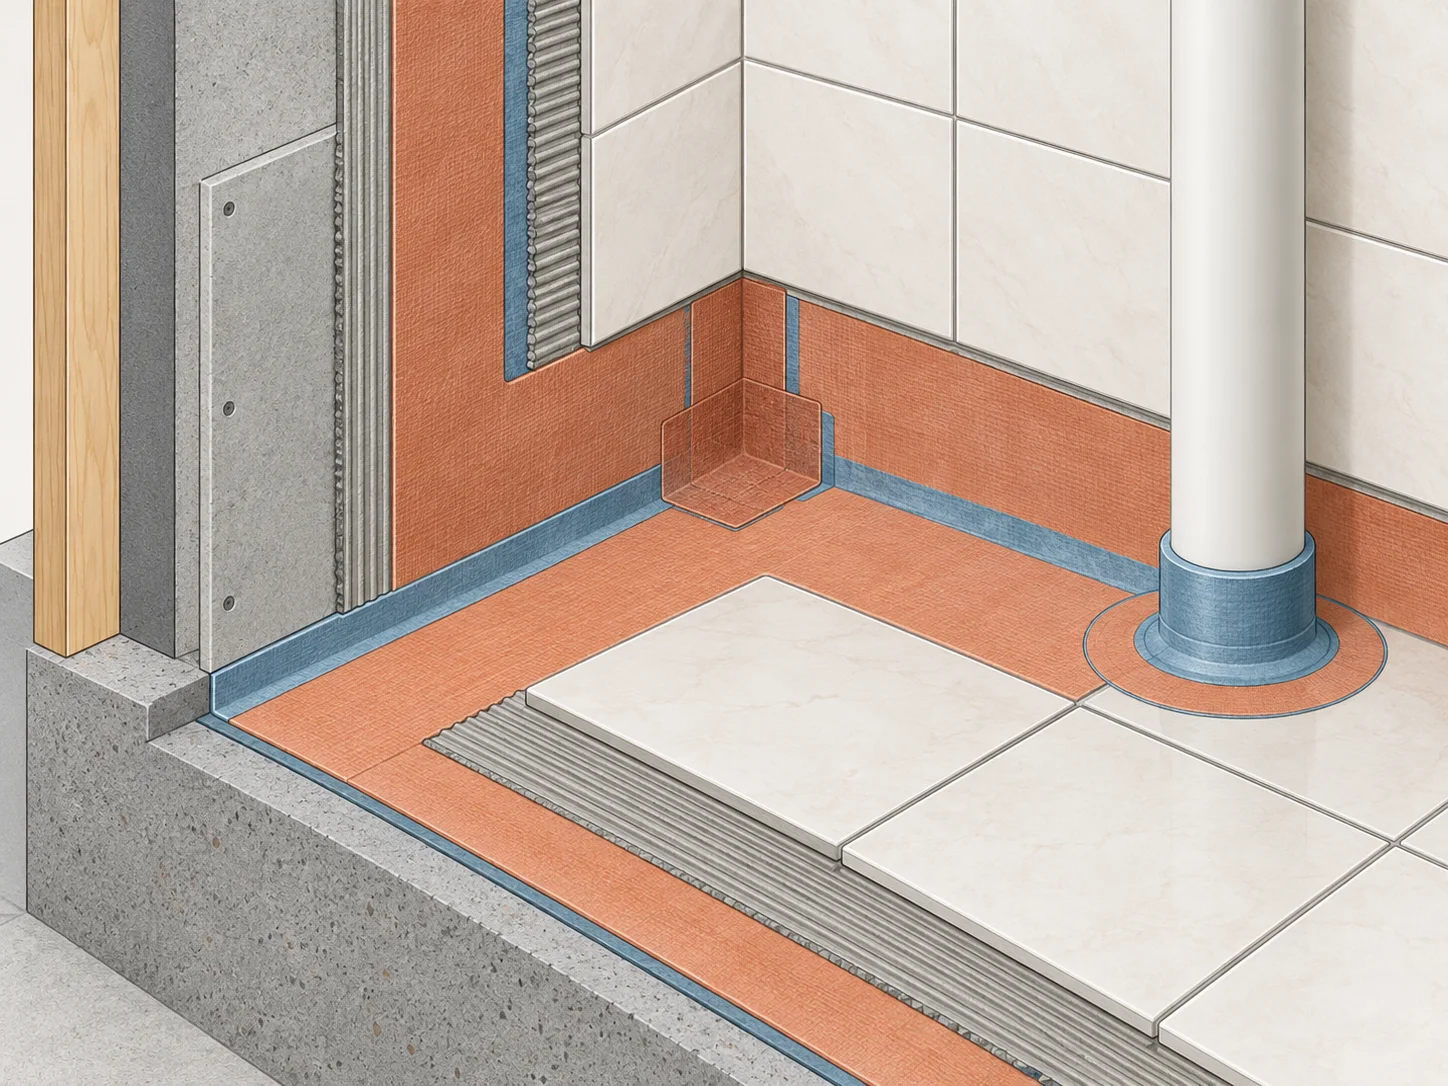
Corners deserve specific attention because two surfaces meet, movement can concentrate there and sealant joints are often relied upon too heavily. The scope should explain how internal corners, wall-to-floor junctions and changes from wall board to masonry will be reinforced and sealed.
Where different materials meet, allow for movement rather than forcing a rigid finish across the junction. Tiling layouts should also avoid placing narrow, awkward cuts directly in the most exposed corners where possible.
6. Detail baths, shower trays and screens
A bath or shower tray is not waterproof simply because it is made from a non-porous material. Water can travel behind the rim, under the edge, around the waste or through a poorly supported connection.
Confirm the order of work and the interface between the bath, tray, wall substrate, membrane, tile and sealant. Ask whether the bath or tray will be installed before waterproofing, whether it will be supported and whether the waterproofing will overlap or connect to the upstand as required by the chosen system.
For shower screens, specify how the screen will be fixed without creating unsealed holes. Drillings through a finished tiled wall should be carefully sealed, and fixings should not compromise the waterproof layer. A shower curtain may require a wider splash zone than a properly enclosed screen.
7. Check pipes, valves and other penetrations
Every pipe, valve, waste, cable route, fixing and recessed fitting creates a potential opening in the waterproofing. The scope should list the penetrations that are known at design stage and explain how each will be sealed.
Pay particular attention to:
- Concealed shower mixers.
- Exposed pipework passing through walls or floors.
- Shower risers and hand-shower outlets.
- Basin and bath supplies.
- Wall-hung toilet frames.
- Heated towel rail connections.
- Electrical cables and bathroom-rated fittings.
- Fixings for shelves, screens and grab rails.
If future accessories may be added, consider installing suitable support and planned fixing points before waterproofing and tiling. Random drilling later can create avoidable risk.
8. Confirm falls, thresholds and drainage
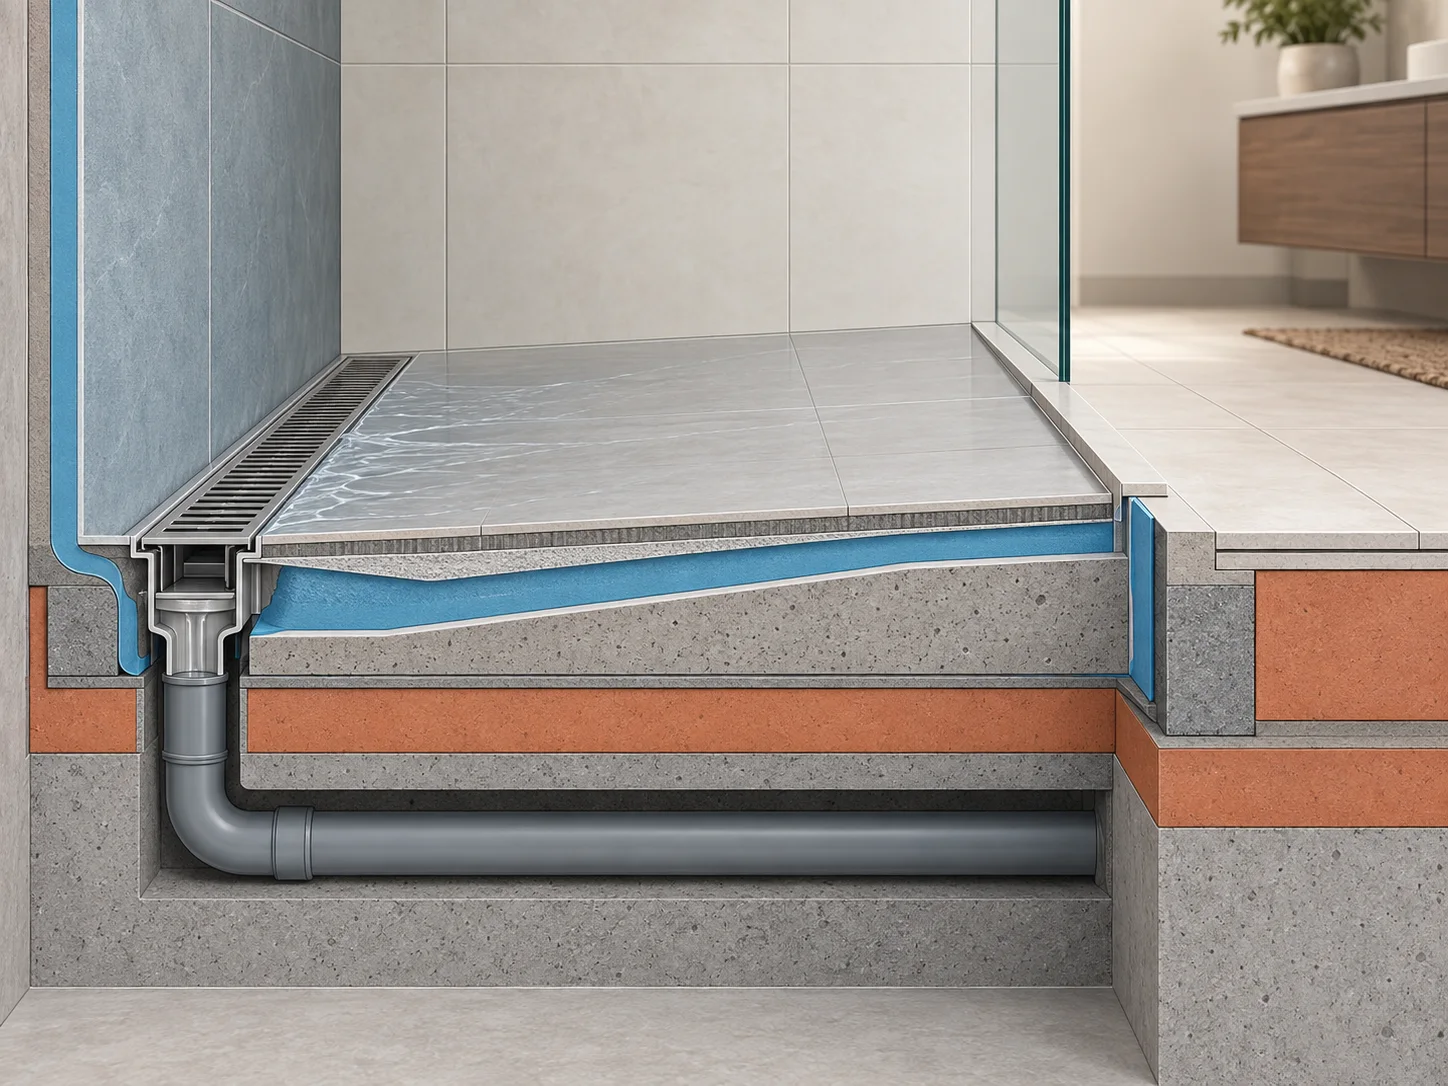
Waterproofing controls water; it does not correct poor drainage. Confirm that shower floors, trays and linear drains are properly supported, that falls direct water toward the waste and that there is no low spot where water can collect.
Review the threshold at the shower entrance and the transition to the main bathroom floor. A level-access shower may need careful coordination between floor depth, waste position, structural build-up, waterproofing and accessibility requirements. A raised tray may simplify drainage but affect access and the finished appearance.
Include checks for the waste connection, trap access, drain grate, tray outlet and any junction between the membrane and drain body. These details should be resolved before tiling begins.
9. Coordinate ventilation and moisture control
Waterproofing reduces liquid-water risk but does not remove humid air. Confirm that the extractor fan, window, air replacement and door undercut are suitable for the room and are coordinated with the electrical and building work.
Persistent condensation can damage paint, plaster, timber and sealants even where the shower waterproofing is correctly installed. Include ventilation checks in the wider bathroom scope, especially in compact rooms with limited natural airflow.
10. Agree inspection, curing and testing
Ask when the waterproofing will be inspected and how long it must cure before adhesive, screed or tile installation. Liquid-applied systems may require multiple coats and a minimum drying period. Sheet systems need correct overlaps, bonded joints and carefully treated penetrations.
Where appropriate for the construction and system, discuss a controlled water or flood test before finishes conceal the work. The installer should follow the manufacturer’s requirements and local practice, particularly where the room is above another floor or a sensitive ceiling.
Photograph the completed waterproofing before it is covered. Keep records showing the wet-area boundaries, corners, collars, drain details and any test results. These photographs are useful for future repairs, alterations and conversations with insurers or contractors.
Room-specific examples
Walk-in shower
A walk-in shower normally needs a clearly defined waterproof floor, continuous protection to all direct-spray walls, carefully formed falls and a reliable drain connection. If the screen is short or the shower is open on two sides, expand the splash zone and check where water is likely to land.
Bath with overhead shower
The bath surround should be treated as a shower area, not merely a decorative tiled wall. Protect the wall behind the shower, the corners, the bath-to-wall junction and the floor around the bath. Confirm that the shower screen or curtain gives sufficient containment for normal use.
Small cloakroom or basin-only room
A cloakroom may not need the same direct-spray waterproofing as a shower room, but the floor, basin splash zone and pipe penetrations still deserve attention. If a washing machine, bidet spray or future shower is planned, include that possibility before finishes are installed.
Bathroom above a living space
Leak consequences are greater when a bathroom sits above a bedroom, kitchen or living room. Consider protecting the full bathroom floor, coordinating pipe routes and providing access to concealed valves and wastes. Make sure the scope explains how water will be contained if a fitting leaks.
Common waterproofing mistakes
- Treating tiles and grout as the waterproof barrier.
- Using a generic “tanked bathroom” description without marked boundaries.
- Ignoring the floor because the shower has a tray.
- Failing to seal pipes, fixings and shower mixer penetrations.
- Installing a membrane over damp, dusty or unstable surfaces.
- Mixing incompatible primers, membranes, tapes and adhesives.
- Relying on silicone to compensate for missing waterproofing or movement control.
- Covering the work before photographs or inspections are completed.
- Forgetting the connection between membrane and drain.
- Allowing a flexible timber floor or poorly supported tray to remain unresolved.
- Drilling through the finished waterproofing without a sealing plan.
- Omitting ventilation and condensation from the moisture-control strategy.
- Accepting a low quote that excludes removal, drying, repairs or waste disposal.
Questions to ask before accepting a quote
Ask the contractor to show the wet-area boundaries on a drawing or marked photograph. Request the proposed waterproofing system, preparation method, corner and penetration details, drain approach, curing times and testing procedure.
Also ask who supplies the membrane and accessories, who is responsible for damage discovered after removal, what evidence will be provided before tiling and whether the quoted price includes waste, protection and reinstatement. A clear answer is more valuable than a broad promise that the room will be “fully waterproofed”.
Finally, compare the waterproofing scope alongside the whole bathroom plan. A different shower position, tray size, niche or floor level can change drainage, substrate preparation and waterproofing requirements.
FAQ
Is bathroom tanking always necessary?
The need and extent depend on the room layout, construction, shower type, substrate and applicable local requirements. Direct-spray areas and wet-room floors generally need a deliberate waterproofing strategy. Ask for the system and boundaries in writing rather than assuming every bathroom receives identical treatment.
Are bathroom tiles waterproof?
Tiles are generally water-resistant, but the tiled surface includes joints, edges, penetrations and movement points. Water can pass through or behind those areas, so tiles and grout should not replace a properly detailed waterproof layer.
Should the whole bathroom floor be waterproofed?
Often, protecting the full floor is a sensible scope, particularly for wet rooms, bathrooms above occupied rooms and areas with multiple water connections. The correct extent depends on the construction, layout and local practice.
Can waterproofing be installed over existing tiles?
Sometimes a system may be suitable for an existing tiled surface, but the tiles must be sound, clean, stable and compatible with the proposed preparation. Removing finishes may be necessary to inspect the substrate or correct damage and movement.
How long should waterproofing dry before tiling?
Drying or curing time depends on the product, temperature, humidity, coats and substrate. Follow the system manufacturer’s instructions and include the waiting period in the programme. Rushing this stage can affect adhesion and performance.
What should I photograph before the tiles go on?
Photograph the complete wet-area coverage, corners, wall-to-floor junctions, pipe collars, shower mixer, bath or tray connection and drain detail. Include a simple room plan or measurements so the concealed details can be located later.
Who should define the waterproofing scope?
The homeowner, designer and installer should agree it together, with the installer confirming the proposed system and method. For complex wet rooms, structural alterations or unusual drainage, obtain appropriate specialist design advice before work starts.
Plan the scope before you spend
Bathroom waterproofing is easiest to improve before walls are closed, trays are fixed and tiles are ordered. Use this checklist to compare remodel ideas, identify dependencies and ask for a quote that describes the actual work. A little time spent defining wet areas, substrate preparation, drainage and concealed details can prevent expensive disruption later.
Explore bathroom remodel ideas on Remodelling Centre and estimate the likely scope before you commit to materials, labour or a final layout.